Capturing the Drop: Photography Tips for High-Altitude Jumps
Ever wonder why your epic bungee jump photos always end up looking like a blurry mess of limbs and a distorted face? You’ve just conquered the fear, your heart is hammering against your ribs, and you want that perfect shot to prove you actually did it. This post breaks down the technical settings, the best gear, and the timing needed to capture high-quality action shots during a high-altitude drop.
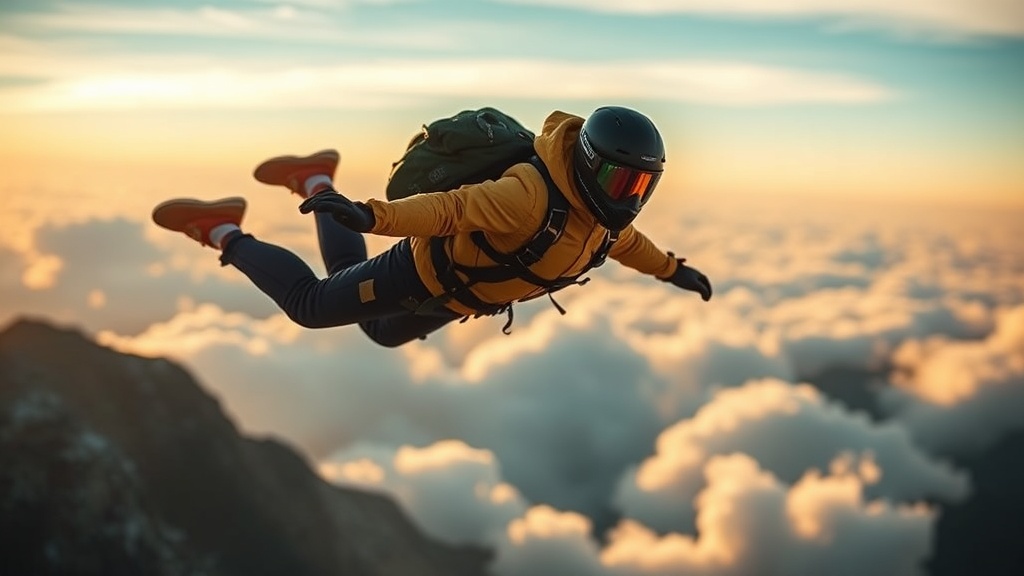
Capturing a jump isn't about having the most expensive camera. It's about understanding how fast things move and how to handle the vibration of a sudden descent. If you don't get the shutter speed right, you're just left with a smear of color where your face used to be.
What Camera Settings Should I Use for Bungee Jumping?
You need a high shutter speed of at least 1/1000th of a second to freeze the motion of a person falling through the air. Without this speed, the motion blur will ruin the shot. Most modern mirrorless cameras or high-end smartphones can handle this, but you have to be intentional about it.
If you're using a professional DSLR or a mirrorless system like a Sony Alpha or a Canon EOS R series, set your mode to Shutter Priority (Tv or S). This allows you to control the most important variable—the speed of the shutter—while the camera handles the rest. If you leave it on Auto, the camera might try to slow down the shutter to let in more light, which is a disaster when you're plummeting toward the ground.
The ISO is the next piece of the puzzle. Since you're often jumping in bright, outdoor environments, you can keep your ISO low (around 100 or 200) to maintain image quality. However, if you're jumping in a shaded canyon or during a cloudy day, don't be afraid to bump it up to 800 or 1600. It's better to have a little bit of digital noise than a blurry photo of your descent.
Aperture matters too, especially if you want that blurry background that makes the subject pop. A wider aperture (a lower f-number like f/2.8 or f/4) creates a shallow depth of field. This keeps the focus strictly on you and makes the distant ground or the jump platform fall out of focus. It looks professional—and it's much more striking for social media.
The Best Gear for Action Photography
You don't need a heavy setup, but you do need something that can survive the wind and the gravity. Here is a breakdown of what works best for different levels of photographers:
| Gear Type | Best For... | Pros | Cons |
|---|---|---|---|
| Action Camera (GoPro Hero 12) | Self-filming/POV | Rugged, waterproof, wide angle | Fixed focus, harder to get "pro" bokeh |
| Mirrorless Camera (Sony A7C) | High-end action shots | Incredible speed and detail | Heavy, expensive, needs care |
| Smartphone (iPhone 15 Pro) | Quick social sharing | Easy to use, great AI processing | Limited manual control in high-speed motion |
If you are using a GoPro, make sure you have a chest mount or a head strap. The GoPro brand is the gold standard for a reason—the stabilization technology is incredible. It makes the violent shaking of a jump look smooth and cinematic rather than nauseating. If you're using a phone, try to use a high-speed burst mode or "Action Mode" if your device supports it.
How Do I Get the Best Angle for a Jump Photo?
Positioning the camera slightly below the jumper provides the most dramatic perspective and makes the fall look longer. This "low angle" shot emphasizes the distance between the jumper and the ground, creating that sense of scale and vertigo that makes bungee jumping so intense.
If a friend is taking the photo, tell them to stand back. You want a bit of "lead room" in the frame. If you are jumping downward, the camera should be positioned so there is plenty of empty space in front of you. This gives the viewer's eye a place to follow your movement. If the frame is too tight, the photo feels claustrophobic rather than expansive.
The best time to shoot is often right at the moment of release or the "rebound" at the bottom of the cord. The release is pure, unadulterated gravity. The rebound—where the cord pulls you back up—is where you get those wild, facial-expression-heavy shots. I've seen people look like absolute legends on the rebound and complete messes on the way down. Both are great, but the rebound is where the character shows.
Don't forget about the lighting. If you're jumping in a canyon, the sun might be directly overhead or hidden by cliffs. If the light is too harsh, your face might be a shadow. A quick tip: if you're using a phone, tap on your face on the screen to tell the camera to prioritize the exposure for your features. It's a small thing, but it makes a massive difference in how clear your eyes look in the shot.
For more on how to prepare for the physical side of the jump, check out how to eat before your leap to ensure you aren't dealing with nausea while trying to look good for the camera.
Is It Safe to Use a Camera During a Jump?
No, you should never attempt to hold a professional camera or a smartphone in your hands while you are actually jumping or falling.
The only way to safely capture your own jump is through a mounted device. This means a GoPro attached to a helmet, a chest harness, or a specialized pole mount. These are designed to stay attached even during high-velocity movement. If you're using a handheld device, you're essentially creating a projectile that could cause serious harm. Always follow the instructions of the jump masters at the site. Most professional bungee sites, like those run by New Zealand tourism boards or AJ Hackett, have strict rules about personal gear during the leap.
If you want a high-quality shot of yourself, rely on the staff. They have high-speed cameras set up on tripods or specialized rigs that are positioned to catch the most dramatic parts of the jump. They've seen it all, and their equipment is built to handle the vibration and the speed of the descent.
That said, if you're a friend watching from the platform, be careful with your zoom. Using a long telephoto lens can actually be a bit tricky because the vibration from the platform can shake the camera. Try to brace your elbows against your body to stabilize the shot. A little bit of steady footing goes a long way when you're trying to track a human being falling at terminal velocity.
If you're interested in the broader aspects of adventure, you might want to read about mastering bungee jumping safety and planning. It's not just about the photo; it's about the whole experience.
One thing to keep in mind: the adrenaline rush doesn't just affect your heart rate. It affects your vision and your perception of time. This is why many people find it hard to "pose" for a camera right after the jump. Your senses are completely overwhelmed. If you're trying to take a photo of a friend, don't expect them to look composed. The raw, messy, slightly terrified look is often the most authentic and beautiful part of the whole experience.
The best shots come from the moments where you aren't even trying to be a model. The wind hitting your face, the hair flying everywhere, and that split second of pure weightlessness. Capture that, and you've got a masterpiece.