How to Capture Epic Bungee Jump Photos: Gear, Settings, and Safety Tips
Ever wondered how to freeze that heart‑stopping free‑fall in a single frame? As a jump master who’s leapt off bridges on five continents, I’ve learned that nailing the perfect bungee photo is as much about timing and safety as it is about gear. In this guide, I’ll walk you through the exact setup I use to capture the thrill without compromising your jump.
Whether you’re a seasoned photographer looking to add adrenaline to your portfolio or a first‑time jumper who wants a souvenir that does justice to the experience, these tips will help you turn a wild plunge into a stunning visual story.
What gear should I bring to shoot a bungee jump?
Choosing the right equipment is the foundation of any successful action shot. Here’s my go‑to kit:
- Camera body: A full‑frame mirrorless with high‑speed burst mode. I swear by the Canon EOS R5 for its 12‑fps RAW burst and excellent low‑light performance.
- Lens: A versatile zoom that covers wide angles to tight telephoto. The Nikon 24‑70mm f/2.8 lets you frame the jumper against the canyon or zoom in for a tight silhouette.
- Monopod: A sturdy monopod (e.g., Manfrotto X‑PRO) gives you mobility while keeping the camera steady for long bursts.
- Safety tether for the camera: A quick‑release safety strap prevents a costly drop if you get a gust of wind.
- Remote shutter release: Allows you to stay focused on the jump without fumbling with the camera button.
How do I set my camera for fast‑moving subjects?
Action photography demands a balance between shutter speed, aperture, and ISO. I use the following baseline settings and adjust on the fly based on lighting:
- Shutter speed: 1/2000 s or faster. This freezes the jumper’s motion and eliminates motion blur.
- Aperture: f/2.8‑f/4 for a shallow depth of field that isolates the subject against the sky.
- ISO: Keep it as low as possible while maintaining proper exposure—typically ISO 200‑400 in daylight, bump up to ISO 800‑1600 during golden hour.
- Drive mode: Continuous high‑speed burst (12‑15 fps) to capture multiple frames during the free‑fall.
- AF mode: AI‑Servo (continuous autofocus) with a single point aimed at the jumper’s harness.
When is the best time of day to shoot?
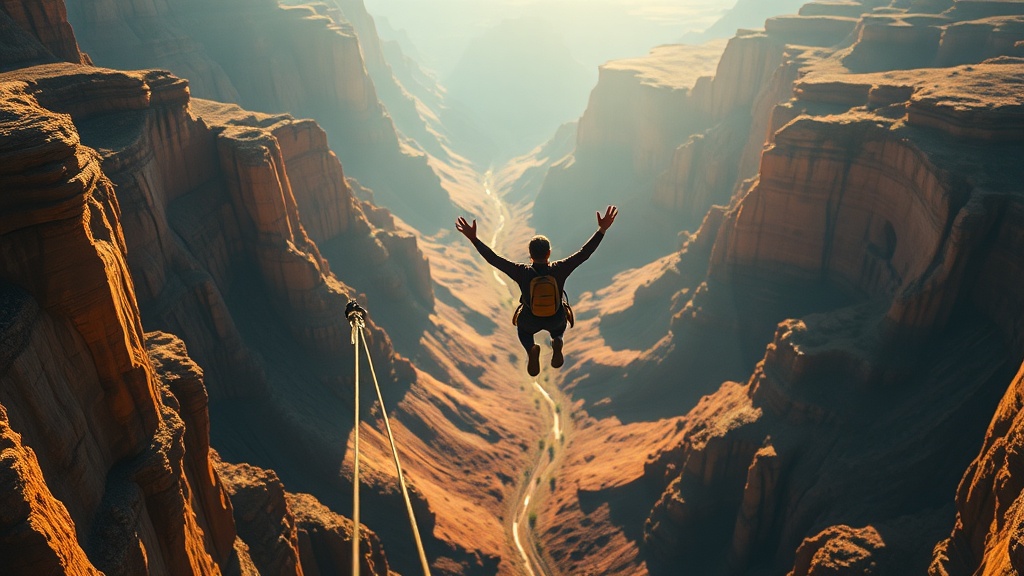
Lighting can make or break your image. I recommend shooting during the “golden hour” — roughly an hour after sunrise or before sunset. The warm, directional light adds drama to the jumper’s silhouette and highlights the landscape behind them.
What safety considerations should I keep in mind while photographing?
Nothing beats a great shot if you compromise safety. Follow these rules:
- Stay behind the safety line: Never step into the jump zone. Position yourself on a stable platform or the edge of a safe viewing area.
- Communicate with the jump crew: Let the jump master know you’re photographing. They’ll give you a clear window for when the jumper is released.
- Secure your gear: Use a safety tether for the camera and keep cables out of the way of the cord.
- Don’t distract the jumper: Keep verbal cues minimal; let the jump crew handle all instructions.
How can I compose a compelling bungee photo?
Composition is where storytelling meets technique. Here are three proven approaches:
1. Silhouette against the sky
Place the jumper in front of a bright sky. Expose for the background, turning the jumper into a dark shape that emphasizes the height and motion.
2. The “Canyon Frame”
Use natural rock arches or cliffs to frame the jumper, creating a sense of depth. Position the camera low to capture both the jumper and the vastness of the canyon.
3. Dynamic Lead‑In
Capture the cord’s curve as it pulls the jumper upward. This line leads the viewer’s eye from the platform to the jumper, adding tension.
What post‑processing tweaks enhance the final image?
Even the best raw shot benefits from a bit of polish. I typically:
- Increase contrast to accentuate the silhouette.
- Boost shadows slightly to bring out details in the cord.
- Apply a subtle vignette to draw focus to the center.
- Sharpen the jumper’s outline without over‑doing it.
Where can I learn more about bungee safety and gear?
If you’re new to the sport, start with the basics before you grab a camera:
- The Ultimate Bungee Jumping Insurance Guide — essential coverage tips.
- 2026 Bungee Jumping Gear Trends — the latest tech, including smart harnesses.
- Bungee Jumping Myths Debunked — separate fact from fiction.
- 5 Emerging Bungee Jumping Destinations — find the perfect backdrop.
- Your First Jump at Harpers Ferry — a beginner‑friendly site with great photo ops.
What’s the final takeaway?
Capturing a bungee jump is a blend of preparation, the right gear, and respect for safety. By setting a fast shutter, using a wide‑aperture lens, and timing your shot during golden hour, you’ll produce images that convey the raw adrenaline and breathtaking scenery of the jump. So strap on that harness, grab your camera, and remember: the best photos come when you’re as focused on safety as you are on the perfect frame.
Ready to shoot? Share your favorite bungee photos in the comments — I love seeing how the community captures the thrill.
Steps
- 1
Pick the Right Gear
Gather a full‑frame mirrorless camera, a fast zoom lens (24‑70mm f/2.8 is ideal), a sturdy monopod, a safety tether, and a remote shutter release.
- 2
Set Camera Settings for Action
Use a shutter speed of 1/2000 s or faster, aperture f/2.8‑f/4, ISO 200‑400 (or higher in low light), continuous high‑speed burst mode, and AI‑Servo autofocus aimed at the jumper’s harness.
- 3
Choose the Golden Hour and Position Safely
Shoot an hour after sunrise or before sunset for dramatic lighting. Stay behind the safety line, communicate with the jump crew, and secure your gear with a tether.
- 4
Compose and Capture the Shot
Try a silhouette against the sky, frame the jumper with a canyon arch, or highlight the cord’s curve as a dynamic lead‑in. Fire the remote release during the free‑fall.
- 5
Post‑Process for Impact
Increase contrast, boost shadows, add a subtle vignette, and sharpen the jumper’s outline to make the image pop.